


When I started playing with the Pretty Pumpkins bundle, I fell in love with the Fall season all over again, not that I needed a nudge – Fall is my favorite season! Did you see my post last week using this set? Here’s another card using this set along with the Grapevine dies. I think you’ll agree that it is gorgeous!
Cut the cardstock as follows:
- Card Base: Cajun Craze – 8 1/2″ x 5 1/2″, score at 4 1/4″
- First Layer: Very Vanilla – 5 1/4″ x 4″, cut two
- Decorative Strip: Regals Designer Series Paper (Cajun Craze) – 5″ x 3/4″
- Pumpkins: Scraps of Very Vanilla
- Vines: Scraps of Mossy Meadow
Assembly:
- Stamp the sentiment onto the upper left side of one of the larger pieces of Very Vanilla cardstock using Mossy Meadow ink. Adhere the DSP strip to the bottom of this piece.
- Use Mossy Meadow ink to stamp the longer vine/flower image to the left side of the Very Vanilla cardstock just slightly above the DSP. Stamp the smaller vine/flower image near the right side. Color the leaves and stems with Light and Dark Old Olive Stampin’ Blends markers and the flowers with Dark Daffodil Delight. Adhere this piece to the card base.
- Stamp the pumpkin image twice onto scraps of Very Vanilla cardstock using Cajun Craze ink. Color the pumpkins with Light and Dark Pumpkin Pie Stampin’ Blends, the stems with Light and Dark Crumb Cake, and the leaves with Light and Dark Old Olive. Crop the images with the coordinating die from the Detailed Pumpkins dies. Fussy cut the two smaller pumpkins from one of the images and use dimensionals to place them directly on top of the other pumpkins image. Attach this to the card front with dimensionals slightly overlapping the stamped vine/flower images.
- Using the large vine die from the Grapevine dies, crop one vine from Mossy Meadow cardstock. Cut a small portion of the vine and attach to the card front with glue, tucking the end under the right side of the pumpkins. Crop the smaller leaf from the Detailed Pumpkins dies and glue it to the card front to the left of the pumpkins on top of the DSP strip. See photo for placement.
- Adhere a few of the bronze color Brushed Metallic Adhesive Baked Dots to the front of the card Refer to photo for placement.
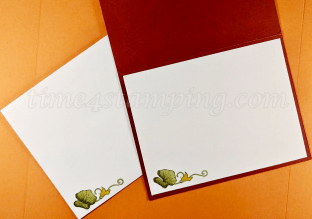
- For the inside of the card, stamp the small vine/flower image onto the lower-left corner of the remaining piece of Very Vanilla cardstock. Color as you did for the front of the card. Stamp a sentiment of your choice onto this piece, or leave it blank to write your own message. Adhere to the inside of the card.
- Decorate the lower-left corner of the envelope with the small vine/flower image as well and color as you did for the card.
Check back here next week when I will be posting another card using the other images and dies from this set!
The products for this card are listed below. Please shop with me here if you would like to purchase any of them. Thank you – I truly appreciate your support!
Product List


 Designer Series Paper")


